
# 实现简易版Vue
# 一、Vue工作机制
简化版:
# 初始化
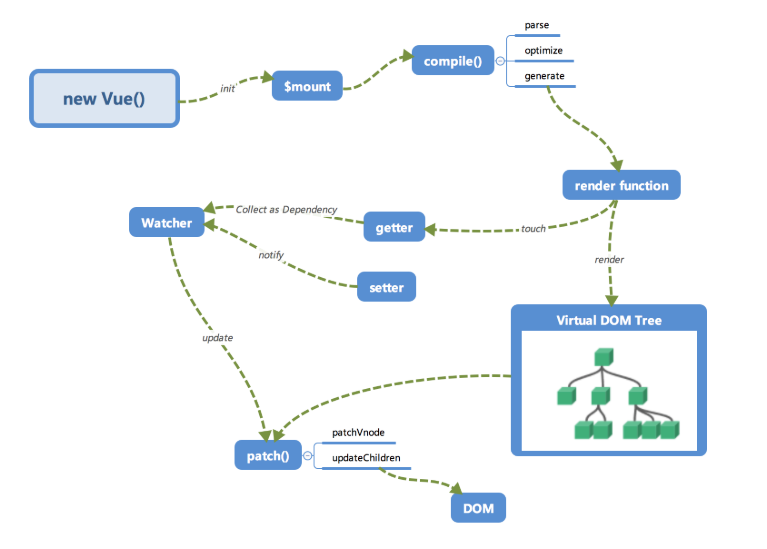
在new Vue()时会调用_init()进行初始化,会初始化各种实例方法、全局方法、执行一些生命周期、初始化props、data等状态。其中最重要的是通过Object.defineProperty设置setter和getter,用来实现响应式和依赖收集。初始化之后调用$mount挂载组件,主要执行编译和首次更新。
# 编译
编译模块分为三个阶段
- parse:使用正则解析template中的vue的指令(v-xxx) 变量等等,形成抽象语法树AST。
- optimize:标记一些静态节点,用作后面的性能优化,在diff的时候直接略过。
- generate:把第一步生成的AST转化为渲染函数
render function。
# 更新
数据修改触发setter,然后监听器会通知进行修改,通过对比新旧vdom树,得到最小修改,就是 patch ,然后只需要把这些差异修改即可。
# 二、Vue响应式原理
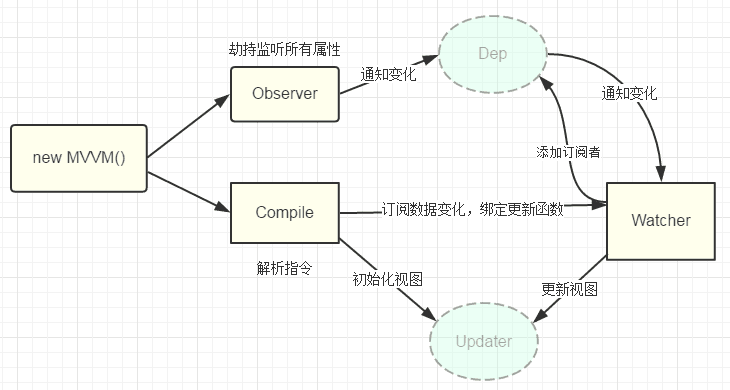
Vue.js的响应式原理依赖于Object.defineProperty,尤大大在Vue.js文档中就已经提到过,这也是Vue.js不支持IE8 以及更低版本浏览器的原因。Vue通过设定对象属性的setter/getter方法来监听数据的变化,通过getter进行依赖收集,而每个setter方法就是一个观察者,在数据变更的时候通知订阅者更新视图。
那么Vue是如何将所有data下面的所有属性变成可观察的(observable)呢?
class KVue {
  constructor(options) {
    this.$options = options;
    this.$data = options.data;
    // 实现响应化
    this.observe(this.$data);
  }

  // 递归遍历,使传递进来的对象响应化
  observe(obj) {
    if (!obj || typeof obj !== "object") {
      return;
    }

    // 遍历
    Object.keys(obj).forEach(key => {
      // 对key做响应式处理
      this.defineReactive(obj, key, obj[key]);
      // 在vue根上定义属性代理data中的数据
      this.proxyData(key);
    });
  }

  // 对key做响应式处理
  defineReactive(obj, key, val) {
    // 递归
    this.observe(val);

    // 给obj定义属性
    Object.defineProperty(obj, key, {
      get() {
        return val;
      },
      set(newVal) {
        if (newVal !== val) {
          val = newVal;
        }
      }
    });
  }

  // 在vue根上定义属性代理data中的数据
  proxyData(key) {
    Object.defineProperty(this, key, {
      get() {
        return this.$data[key];
      },
      set(newVal) {
        this.$data[key] = newVal;
      }
    });
  }
}
2
3
4
5
6
7
8
9
10
11
12
13
14
15
16
17
18
19
20
21
22
23
24
25
26
27
28
29
30
31
32
33
34
35
36
37
38
39
40
41
42
43
44
45
46
47
48
49
50
51
52
53
proxyData 的作用就是方便我们直接使用vm.age去操作vm.$data.age。
# 三、依赖收集与追踪
# 为什么要依赖收集
先看下面这段代码
new Vue({
    template:
        `<div>
            <span>text1:</span> {{text1}}
            <span>text1:</span> {{text1}}
            <span>text2:</span> {{text2}}
        <div>`,
    data: {
        text1: 'text1',
        text2: 'text2',
        text3: 'text3'
    }
});
2
3
4
5
6
7
8
9
10
11
12
13
按照上面响应式原理中的方法进行绑定则会出现一个问题,text3在实际模板中并没有被用到,然而当text3的数据被修改的时候,同样会触发text3的setter导致重新执行渲染,这显然不正确。因此我们需要扫描视图收集依赖,知道视图中到底哪些地方对数据有依赖,这样当数据变化时才知道要不要重新执行渲染。
# 实现依赖收集
我们需要一个 Watcher(观察者)对象,每当遇到 { {text1} } 这样的插值表达式,就创建一个Watcher,将来text1数值变化的时候,由于Watcher知道和哪个属性以及哪个元素绑定,以及有对应的更新函数,就会利用更新函数,去更新对应的节点。
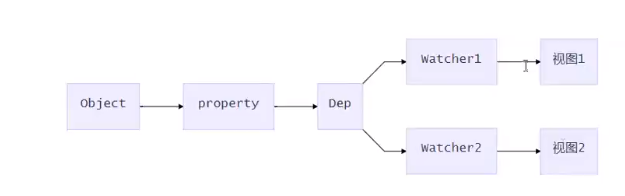
但是有的时候,一个属性可能会有多个watcher,比如上面模板里出现了两次 text1,就会创建两个watcher。这个时候就需要"大管家" Dep(依赖收集类) 去管理这两个watcher,当text1发生变化的时候,会通知这两个 Watcher 一起去做更新。
# 属性、Dep、Watcher之间的关系
// Dep:管理若干watcher实例,它和key一对一关系,key就是上面的text1
class Dep {
  constructor() {
    this.deps = []; // 保存单个key的多个watcher
  }
  addDep(watcher) {
    this.deps.push(watcher);  // 把watcher加到deps里面
  }
  notify() {
    this.deps.forEach(watcher => watcher.update()); // 执行这个key所对应的多个更新函数
  }
}

// 保存视图中依赖,实现update函数
class Watcher {
  constructor(vm, key, cb) {
    this.vm = vm;
    this.key = key;
    this.cb = cb;

    Dep.target = this; // 将当前实例指向Dep.target
    this.vm[this.key]; // 读一次key触发getter,这样就能把watcher添加到Dep里面
    Dep.target = null; // 清除引用,因为可能还有其它的watcher
  }
  // 更新函数
  update() {
    this.cb.call(this.vm, this.vm[this.key])
  }
}
2
3
4
5
6
7
8
9
10
11
12
13
14
15
16
17
18
19
20
21
22
23
24
25
26
27
28
29
# 为什么有Dep.target = this
在编译compile阶段,会遇到很多{ {text1} } 这样的插值表达式,这个时候会创建watcher,watcher会保存key(即text1),以及对应的更新函数。那么如何把watcher添加到Dep里面呢?可以分两步做:
(1)在创建watcher时,用Dep.target保存当前key的watcher实例,并触发当前key的get方法。
// 将当前实例指向Dep.target
Dep.target = this; // 将当前实例指向Dep.target
this.vm[this.key]; // 读一次key触发getter,这样就能把watcher添加到Dep里面
Dep.target = null; // 清除引用,因为可能还有其它的watcher
2
3
4
(2)在对key做响应式处理时,创建当前key的Dep实例,并在get方法里面把Dep.target添加到Dep里。
  // 对key做响应式处理
  defineReactive(obj, key, val) {
    this.observe(val);   // 递归
+   const dep = new Dep();  // 创建Dep实例:Dep和key一对一对应
    // 给obj定义属性
    Object.defineProperty(obj, key, {
      get() {
+       Dep.target && dep.addDep(Dep.target); // 当getter被触发时,将Dep.target指向的Watcher实例加入到Dep中.
        return val;
      },
      set(newVal) {
        if (newVal !== val) {
          val = newVal;
+         dep.notify(); // 当setter被触发时,dep会通知该dep管理的所有watcher去做更新.
        }
      }
    });
  }
2
3
4
5
6
7
8
9
10
11
12
13
14
15
16
17
18
注意
在Vue1.0的时候,由于一个插值表达式{ {} }就对应一个watcher,watcher数量太多,导致性能下降。所以在Vue2.0的时候,为了提高性能,一个组件对应一个watcher,watcher数量减少,但是不知道哪个属性发生了变化,怎么办?Vue2.0引入了虚拟DOM的概念,只要数据发生改变,就做diff操作,得到最小的DOM操作。
# 四、编译compile
compile主要做的事情是解析模板指令,将模板中的变量替换成数据,然后初始化渲染页面视图,并将每个指令对应的节点绑定更新函数,添加监听数据的订阅者,一旦数据有变动,收到通知,更新视图。
# 实现compile
// 遍历模板,将里面的插值表达式处理,另外如果发现k-xx, @xx做特别处理
class Compile {
  constructor(el, vm) {
    this.$vm = vm;
    this.$el = document.querySelector(el);

    if (this.$el) {
      // 1.$el中的内容搬家到一个fragment,提高操作效率
      this.$fragment = this.node2Fragment(this.$el);

      // 2.编译fragment
      this.compile(this.$fragment);

      // 3.将编译结果追加至宿主中
      this.$el.appendChild(this.$fragment);
    }
  }

  // 遍历el,把里面内容搬到新创建fragment中
  node2Fragment(el) {
    const fragment = document.createDocumentFragment();
    let child;
    while ((child = el.firstChild)) {
      fragment.appendChild(child);
    }
    return fragment;
  }

  // 把动态值替换,把指令和事件做处理
  compile(el) {
    // 遍历el
    const childNodes = el.childNodes;
    Array.from(childNodes).forEach(node => {
      if (this.isElement(node)) {
        // 如果是元素节点,我们要处理指令k-xx,事件@xx
        this.compileElement(node);
      } else if (this.isInterpolation(node)) {
        // 如果是插值表达式,则编译text
        this.compileText(node);
      }
      //   递归子元素
      if (node.childNodes && node.childNodes.length > 0) {
        this.compile(node);
      }
    });
  }

  isElement(node) {
    return node.nodeType === 1;
  }
  // 插值表达式判断
  isInterpolation(node) {
    // 需要满足{{xx}}
    return node.nodeType === 3 && /\{\{(.*)\}\}/.test(node.textContent);
  }

  compileElement(node) {
    // 查看node的特性中是否有k-xx,@xx
    const nodeAttrs = node.attributes;
    Array.from(nodeAttrs).forEach(attr => {
      // 获取属性名称和值 k-text="abc"
      const attrName = attr.name; // k-text
      const exp = attr.value; // abc
      // 指令:k-xx
      if (attrName.indexOf("k-") === 0) {
        const dir = attrName.substring(2); // text
        // 执行指令
        this[dir] && this[dir](node, this.$vm, exp);
      } else if(attrName.indexOf('@') === 0) {
        // 事件 @click="handlClick"
        const eventName = attrName.substring(1); // click
        this.eventHandler(node, this.$vm, exp, eventName);
      }
    });
  }
  text(node, vm, exp) {
    this.update(node, vm, exp, "text");
  }
  //  双向数据绑定
  model(node, vm, exp) {
    // update是数据变了改界面
    this.update(node, vm, exp, "model");
    // 界面变了改数值
    node.addEventListener("input", e => {
      vm[exp] = e.target.value;
    });
  }

  modelUpdator(node, value) {
    node.value = value;
  }

  html(node, vm, exp) {
    this.update(node, vm, exp, "html");
  }
  htmlUpdator(node, value) {
    node.innerHTML = value;
  }

  eventHandler(node, vm, exp, eventName){
    // 获取回调函数
    const fn = vm.$options.methods && vm.$options.methods[exp];
    if(eventName && fn) {
        node.addEventListener(eventName, fn.bind(vm))
    }
  }

  // 把插值表达式替换为实际内容
  compileText(node) {
    // {{xxx}}
    // RegExp.$1是匹配分组部分
    // console.log(RegExp.$1);
    const exp = RegExp.$1;
    this.update(node, this.$vm, exp, "text");
  }

  // 编写update函数,它可复用
  // exp是表达式, dir是具体操作:text,html,model
  update(node, vm, exp, dir) {
    const fn = this[dir + "Updator"];
    fn && fn(node, vm[exp]);
    // 创建Watcher
    new Watcher(vm, exp, function() {
      fn && fn(node, vm[exp]);
    });
  }

  textUpdator(node, value) {
    node.textContent = value;
  }
}
2
3
4
5
6
7
8
9
10
11
12
13
14
15
16
17
18
19
20
21
22
23
24
25
26
27
28
29
30
31
32
33
34
35
36
37
38
39
40
41
42
43
44
45
46
47
48
49
50
51
52
53
54
55
56
57
58
59
60
61
62
63
64
65
66
67
68
69
70
71
72
73
74
75
76
77
78
79
80
81
82
83
84
85
86
87
88
89
90
91
92
93
94
95
96
97
98
99
100
101
102
103
104
105
106
107
108
109
110
111
112
113
114
115
116
117
118
119
120
121
122
123
124
125
126
127
128
129
130
131
因为遍历解析的过程有多次操作dom节点,为提高性能和效率,会先将vue实例根节点的el转换成文档碎片fragment进行解析编译操作,解析完成,再将fragment添加回原来的真实dom节点中。
compile方法将遍历所有节点及其子节点,进行扫描解析编译,调用对应的指令渲染函数进行数据渲染,并调用对应的指令更新函数进行绑定。
# 开始编译
Vue构造方法里面,添加编译compile的逻辑.
  constructor(options) {
    this.$options = options;
    this.$data = options.data;
    // 响应化
    this.observe(this.$data);
+   // 创建编译器
+   new Compile(options.el, this);
  }
2
3
4
5
6
7
8
# 五、整合一下,测试功能
<!DOCTYPE html>
<html lang="en">

<head>
    <meta charset="UTF-8">
    <meta name="viewport" content="width=device-width, initial-scale=1.0">
    <meta http-equiv="X-UA-Compatible" content="ie=edge">
    <title>Document</title>
</head>

<body>
    <div id="app">
      <p>{{name}}</p>
      <p k-text="name"></p>
      <p>{{age}}</p>
      <input type="text" k-model="name">
      <button @click="changeName">改变名字</button>
      <div k-html="html"></div>
    </div>
    <script src='./kvue.js'></script>
    <script>
      new KVue({
        el:'#app',
        data: {
          name: "test",
          age:1,
          html:'<button>这是一个按钮</button>'
        },
        created(){
          setTimeout(()=>{
            this.name='test1'
          }, 1000)
        },
        methods:{
          changeName(){
            this.name = 'test2'
            this.age = 2
          }
        }
      })
    </script>
  </body>
</html>
2
3
4
5
6
7
8
9
10
11
12
13
14
15
16
17
18
19
20
21
22
23
24
25
26
27
28
29
30
31
32
33
34
35
36
37
38
39
40
41
42
43
← Vue生命周期 Vue源码解读(一) →