
# React核心
使用create-react-app 脚手架创建React应用
安装脚手架:npm install -g create-react-app
创建项目:create-react-app my-app
启动项目:npm start
使用 npm run eject 弹出项目真面目,会多出两个目录:
├── config
    ├── env.js 处理.env环境变量配置文件
    ├── paths.js 提供各种路径
    ├── webpack.config.js webpack配置文件
    └── webpackDevServer.config.js 测试服务器配置文件
└── scripts 启动、打包和测试脚本
    ├── build.js 打包脚本
    ├── start.js 启动脚本
    └── test.js 测试脚本
2
3
4
5
6
7
8
9
env.js用来处理.env文件中配置的环境变量
// node运行环境:development、production、test等
const NODE_ENV = process.env.NODE_ENV;
// 要扫描的文件名数组
var dotenvFiles = [
    `${paths.dotenv}.${NODE_ENV}.local`, // .env.development.local
    `${paths.dotenv}.${NODE_ENV}`, // .env.development
    NODE_ENV !== 'test' && `${paths.dotenv}.local`, // .env.local
    paths.dotenv, // .env
].filter(Boolean);
// 从.env*文件加载环境变量
dotenvFiles.forEach(dotenvFile => {
    if (fs.existsSync(dotenvFile)) {
        require('dotenv-expand')(
            require('dotenv').config({
                path: dotenvFile,
            })
        );
    }
});
2
3
4
5
6
7
8
9
10
11
12
13
14
15
16
17
18
19
# 一、JSX
React和ReactDOM的关系:React负责逻辑控制,数据 -> VDOM;ReactDom渲染实际DOM,VDOM -> DOM。
JSX是一种JavaScript的语法扩展,其格式比较像模版语言,但事实上完全是在JavaScript内部实现的。JSX可以很好地描述UI,能够有效提高开发效率。
import React, { Component } from 'react';
import logo from '../imgs/logo.svg';
import '../css/index.css';  //全局导入css
import indexStyle from '../css/index.module.css';  //模块化导入css

// class类型组件,继承了component,实现了render方法
// 创建组件快捷键rcc
export default class JsxTest extends Component {
    render() {
        var arr = [1, 2, 3].map(t => <li key={t}>{t}</li>);
        // style={{width:100}}  里面的{width:100}是一个对象,外层的{}表示这是一个动态值
        // class类要用className, 模块化的方式className={indexStyle.img}
        return (
            <div>
                <ul>{arr}</ul>
                {/* 属性:静态值用双引号,动态值用花括号;class、for等要特殊处理。 */}
                <img src={logo} style={{ width: 100 }} className="img" />
                {/* 多个className写法1 */}
                <img src={logo} style={{ width: 100 }} className={`${indexStyle.img1} ${indexStyle.img2}`} />
                {/* 多个className写法2 */}
                <img src={logo} style={{ width: 100 }} className={[indexStyle.img1, indexStyle.img2].join(' ')} />
            </div>
        )
    }
}
2
3
4
5
6
7
8
9
10
11
12
13
14
15
16
17
18
19
20
21
22
23
24
25
JSX 防止注入攻击,你可以安全地在 JSX 当中插入用户输入内容:
const title = response.potentiallyMaliciousInput;
// 直接使用是安全的:
const element = <h1>{title}</h1>;
2
3
React DOM 在渲染所有输入内容之前,默认会进行转义。它可以确保在你的应用中,永远不会注入那些并非自己明确编写的内容。所有的内容在渲染之前都被转换成了字符串。这样可以有效地防止 XSS(cross-site-scripting, 跨站脚本)攻击。
# 二、组件
# class组件
class组件通常拥有状态和生命周期,继承于Component,实现render方法
import React, { Component } from "react";
import logo from "../logo.svg";
import style from "../index.module.css";
export default class JsxTest extends Component {
    render() {
        const name = "react study";
        const user = { firstName: "tom", lastName: "jerry" };
        function formatName(user) {
            return user.firstName + " " + user.lastName;
        }
        const greet = <p>hello, Jerry</p>;
        const arr = [1, 2, 3].map(num => <li key={num}>{num}</li>);
        return (
            <div>
                {/* 条件语句 */}
                {name ? <h2>{name}</h2> : null}
                {/* 函数也是表达式 */}
                {formatName(user)}
                {/* jsx也是表达式 */}
                {greet}
                {/* 数组 */}
                <ul>{arr}</ul>
                {/* 属性 */}
                <img src={logo} className={style.img} alt="" />
            </div>
        );
    }
}
2
3
4
5
6
7
8
9
10
11
12
13
14
15
16
17
18
19
20
21
22
23
24
25
26
27
28
# function组件
函数组件通常无状态,仅关注内容展示,返回渲染结果即可。
import React from "react";
import JsxTest from "./components/JsxTest";
function App() {
    return (
        <div>
          <JsxTest />
        </div>
    );
}
export default App;
2
3
4
5
6
7
8
9
10
# 三、state
# class组件的状态管理
import React, { Component } from 'react'

// class组件的状态管理
class Clock extends Component {
    constructor(props) {
        super(props);  // 基础父组件的构造方法
        // 初始化状态
        this.state = {
            date: new Date(),
            counter: 0
        }
    }
    componentDidMount() {
        this.timeid = setInterval(() => {
            this.setState({
                date: new Date()
            })
        }, 1000)
        this.setState((prevState) => {
            console.log('nu1', prevState.counter)  // 0
            return { counter: prevState.counter + 1 }
        }, () => {
            console.log('test1', this.state.counter) //3
        });
        this.setState((prevState) => {
            console.log('nu2', prevState.counter)  // 1
            return { counter: prevState.counter + 1 }
        }, () => {
            console.log('test2', this.state.counter)  // 3
        });
        this.setState((prevState) => {
            console.log('nu3', prevState.counter)  // 2
            return { counter: prevState.counter + 1 }
        }, () => {
            console.log('test3', this.state.counter) //3
        });
    }
    componentWillUnmount() {
        clearInterval(this.timeid)
    }
    render() {
        return (
            <div>
                {this.state.date.toLocaleTimeString()}
            </div>
        )
    }
}
2
3
4
5
6
7
8
9
10
11
12
13
14
15
16
17
18
19
20
21
22
23
24
25
26
27
28
29
30
31
32
33
34
35
36
37
38
39
40
41
42
43
44
45
46
47
48
# function组件的状态管理
function组件的状态管理仅在react>=16.8才支持,利用react hooks实现。
import { useState, useEffect } from "react";  // 引入hooks

function ClockFunc() {
    //创建状态,useState返回状态和修改该状态的函数所组成的数组
    const [date, setDate] = useState(new Date());
    //返回一个数组,第一个元素是当前状态,第二个是修改这个状态的函数
    console.log('useState',useState(new Date()));
    // useEffect编写副作用代码
    useEffect(() => {
        // 启动定时器是我们的副作用代码
        const timerID = setInterval(() => {
            setDate(new Date());
        }, 1000);
        // 返回清理函数
        return () => clearInterval(timerID);
    }, []);// 参数2传递空数组使我们参数1函数仅执行一次
    return <div>{date.toLocaleTimeString()}</div>;
}

// 快捷键 rfc
export default function StateMgt() {
    return (
        <div>
            <ClockFunc />
        </div>
    )
}
2
3
4
5
6
7
8
9
10
11
12
13
14
15
16
17
18
19
20
21
22
23
24
25
26
27
# setState特性
- 用setState更新状态而不是直接修改
this.state.counter += 1; //错误的
- setState是批量执行的,因此对同一个状态执行多次只起一次作用,多个状态更新可以放在同一个setState中进行
componentDidMount() {
    // 假如couter初始值为0,执行三次以后其结果是多少?
    this.setState({counter: this.state.counter + 1});
    this.setState({counter: this.state.counter + 1});
    this.setState({counter: this.state.counter + 1});
    console.log(this.state.counter);  // 值不会变,因为setState是异步的
}
2
3
4
5
6
7
- setState通常是异步的
出于性能考虑,React 可能会把多个 setState() 调用合并成一个调用。因此如果要获取到最新状态值有以下四种方式:
(1)使用setState第二个参数,传入回调函数
this.setState({counter: this.state.counter + 1},()=>{
   console.log('回调函数',this.state.counter);  // 使用回调函数
}); // 输出1
this.setState({counter: this.state.counter + 1},()=>{
   console.log('回调函数',this.state.counter);  // 使用回调函数
}); // 输出1
this.setState({counter: this.state.counter + 1},()=>{
   console.log('回调函数',this.state.counter);  // 使用回调函数
}); // 输出1
2
3
4
5
6
7
8
9
(2)传递函数给setState的第一个参数(推荐这种方式)
这个函数用上一个 state 作为第一个参数,将此次更新被应用时的 props 做为第二个参数:
this.setState((prevState) => {
    console.log('nu1', prevState.counter)  // 0
    return { counter: prevState.counter + 1 }
}, () => {
    console.log('test1', this.state.counter) //3
});

this.setState((prevState) => {
    console.log('nu2', prevState.counter)  // 1
    return { counter: prevState.counter + 1 }
}, () => {
    console.log('test2', this.state.counter)  // 3
});

this.setState((prevState) => {
    console.log('nu3', prevState.counter)  // 2
    return { counter: prevState.counter + 1 }
}, () => {
    console.log('test3', this.state.counter) //3
});
2
3
4
5
6
7
8
9
10
11
12
13
14
15
16
17
18
19
20
对于传入函数的方式,在调用 setState 进行更新 state 时,React 会按照各个 setState 的调用顺序,将它们依次放入一个队列,然后,在进行状态更新时,则按照队列中的先后顺序依次调用,并将上一个调用结束时产生的 state 传入到下一个调用的函数中,当然,第一个 setState 调用时,传入的 prevState 则是当前的state ,如此,便解决了传入对象式调用 setState 方法所存在的不能依赖上一次的 state 去计算本次state的问题。回调函数里面的是最后执行的。
(3)使用定时器:
setTimeout(() => {
    console.log(this.state.counter);
}, 0);
2
3
(4)原生事件中修改状态
componentDidMount(){
    document.body.addEventListener('click', this.changeValue, false)
}
changeValue = () => {
    this.setState({counter: this.state.counter+1})
    console.log(this.state.counter)
}
2
3
4
5
6
7
# 四、事件处理
React 事件的命名采用小驼峰式(camelCase),而不是纯小写。使用 JSX 语法时你需要传入一个函数作为事件处理函数,而不是一个字符串。
在 React 中另一个不同点是你不能通过返回 false 的方式阻止默认行为。你必须显式的使用 preventDefault 。例如,传统的 HTML 中阻止链接默认打开一个新页面,你可以这样写:
<a href="#" onclick="console.log('The link was clicked.'); return false">
  Click me
</a>
2
3
在 React 中,可能是这样的:
function ActionLink() {
  function handleClick(e) {
    e.preventDefault();
    console.log('The link was clicked.');
  }

  return (
    <a href="#" onClick={handleClick}>
      Click me
    </a>
  );
}
2
3
4
5
6
7
8
9
10
11
12
在这里,e 是一个合成事件。React 根据 W3C 规范来定义这些合成事件,所以你不需要担心跨浏览器的兼容性问题。
# 事件里面this的绑定
下面的 Toggle 组件会渲染一个让用户切换开关状态的按钮。
3种方法绑定this:(1)使用bind进行绑定 (2)public class fields 语法 (推荐用) (3)使用箭头函数
- (1)使用bind进行绑定
class Toggle extends React.Component {
  constructor(props) {
    super(props);
    this.state = {isToggleOn: true};

    // 为了在回调中使用 `this`,这个绑定是必不可少的
    this.handleClick = this.handleClick.bind(this);   // bind绑定
  }

  handleClick() {
    this.setState(state => ({
      isToggleOn: !state.isToggleOn
    }));
  }

  render() {
    return (
      <button onClick={this.handleClick}>
        {this.state.isToggleOn ? 'ON' : 'OFF'}
      </button>
    );
  }
}

ReactDOM.render(
  <Toggle />,
  document.getElementById('root')
);
2
3
4
5
6
7
8
9
10
11
12
13
14
15
16
17
18
19
20
21
22
23
24
25
26
27
28
注意只能在构造函数constructor方法里面绑定。
- (2) public class fields 语法 (这种语法在事件函数要携带参数的时候要额外bind一次)
class LoggingButton extends React.Component {
  // 此语法确保 `handleClick` 内的 `this` 已被绑定。
  // 注意: 这是 *实验性* 语法。
  handleClick = () => {
    console.log('this is:', this);
  }

  render() {
    return (
      <button onClick={this.handleClick}>
        Click me
      </button>
    );
  }
}
2
3
4
5
6
7
8
9
10
11
12
13
14
15
Create React App 默认启用此语法,注意 handleClick必须使用箭头函数。
- (3) 使用箭头函数
class LoggingButton extends React.Component {
  handleClick() {
    console.log('this is:', this);
  }

  render() {
    // 此语法确保 `handleClick` 内的 `this` 已被绑定。
    return (
      <button onClick={(e) => this.handleClick(e)}>
        Click me
      </button>
    );
  }
}
2
3
4
5
6
7
8
9
10
11
12
13
14
此语法问题在于每次渲染 LoggingButton 时都会创建不同的回调函数。在大多数情况下,这没什么问题,但如果该回调函数作为 prop 传入子组件时,这些组件可能会进行额外的重新渲染。我们通常建议在构造器中绑定或使用 class fields 语法来避免这类性能问题。
# 向事件处理程序传递参数
在循环中,通常我们会为事件处理函数传递额外的参数。例如,若 id 是你要删除那一行的 ID,以下两种方式都可以向事件处理函数传递参数:
<button onClick={(e) => this.deleteRow(id, e)}>Delete Row</button>
<button onClick={this.deleteRow.bind(this, id)}>Delete Row</button>
2
上述两种方式是等价的,分别通过箭头函数和 Function.prototype.bind 来实现。
在这两种情况下,React 的事件对象 e 会被作为第二个参数传递。如果通过箭头函数的方式,事件对象必须显式的进行传递,而通过 bind 的方式,事件对象以及更多的参数将会被隐式的进行传递。
# 五、条件渲染和循环渲染
# 条件渲染
创建一个名叫 LoginControl 的有状态的组件。它将根据当前的状态来渲染 <LoginButton /> 或者 <LogoutButton />。同时它还会渲染上一个示例中的 <Greeting />。
import React from 'react';

function UserGreeting(props) {
    return <h1>Welcome back!</h1>;
}
function GuestGreeting(props) {
    return <h1>Please sign up.</h1>;
}
function Greeting(props) {
    const isLoggedIn = props.isLoggedIn;
    if (isLoggedIn) {
        return <UserGreeting />;
    }
    return <GuestGreeting />;
}
function LoginButton(props) {
    return (
        <button onClick={props.onClick}>
            Login
        </button>
    );
}
function LogoutButton(props) {
    return (
        <button onClick={props.onClick}>
            Logout
      </button>
    );
}

class LoginControl extends React.Component {
    constructor(props) {
        super(props);
        this.handleLoginClick = this.handleLoginClick.bind(this);
        this.handleLogoutClick = this.handleLogoutClick.bind(this);
        this.state = { isLoggedIn: false };
    }
    handleLoginClick() {
        this.setState({ isLoggedIn: true });  // 登陆
    }
    handleLogoutClick() {
        this.setState({ isLoggedIn: false }); // 登出
    }
    render() {
        const isLoggedIn = this.state.isLoggedIn;
        let button;

        if (isLoggedIn) {
            button = <LogoutButton onClick={this.handleLogoutClick} />;
        } else {
            button = <LoginButton onClick={this.handleLoginClick} />;
        }

        return (
            <div>
                <Greeting isLoggedIn={isLoggedIn} />
                {button}
            </div>
        );
    }
}
export default LoginControl
2
3
4
5
6
7
8
9
10
11
12
13
14
15
16
17
18
19
20
21
22
23
24
25
26
27
28
29
30
31
32
33
34
35
36
37
38
39
40
41
42
43
44
45
46
47
48
49
50
51
52
53
54
55
56
57
58
59
60
61
62
在极少数情况下,你可能希望能隐藏组件,即使它已经被其他组件渲染。若要完成此操作,你可以让 render 方法直接返回 null,而不进行任何渲染。
# 循环渲染
元素的 key 只有放在就近的数组上下文中才有意义。
比方说,如果你提取出一个 ListItem 组件,你应该把 key 保留在数组中的这个 <ListItem /> 元素上,而不是放在 ListItem 组件中的 <li> 元素上。
function ListItem(props) {
  // 这里不需要指定 key:
  return <li>{props.value}</li>;
}
function NumberList(props) {
  const numbers = props.numbers;
  return (
    <ul>
      {numbers.map((number) =>
        <ListItem key={number.toString()} value={number} />
      )}
    </ul>
  );
}
2
3
4
5
6
7
8
9
10
11
12
13
14
# 六、表单
# 七、组件通信
# Props属性传递
Props属性传递可用于父子组件相互通信
// index.js
ReactDOM.render(<App title="标题" />, document.querySelector('#root'));
// App.js
<h2>{this.props.title}</h2>
2
3
4
如果父组件传递的是函数,则可以把子组件信息传入父组件,这个常称为状态提升,StateMgt.js
// StateMgt
<Clock change={this.onChange}/>

// Clock
this.timerID = setInterval(() => {
    this.setState({
        date: new Date()
        }, ()=>{
        // 每次状态更新就通知父组件
        this.props.change(this.state.date);
    });
}, 1000);
2
3
4
5
6
7
8
9
10
11
12
# redux
# 八、生命周期
# 九、虚拟DOM
虚拟DOM就是JS对象。生成DOM消耗的性能很高,而生成虚拟DOM对象就可以极大地提升性能。React中,先生成虚拟DOM,再创建真实DOM。JSX实质上是调用了React.createElement去生成虚拟DOM。
JSX->createElement->虚拟DOM->真实DOM
# 优点
- 提升性能
- 它使得跨端应用得以实现,比如 React Native
# diff算法
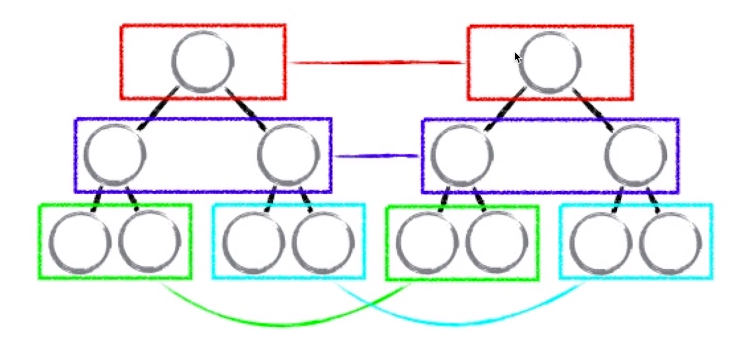
比较步骤:
- 同层比较,如果同层不同,则不往下比对了,直接替换
- 比较key
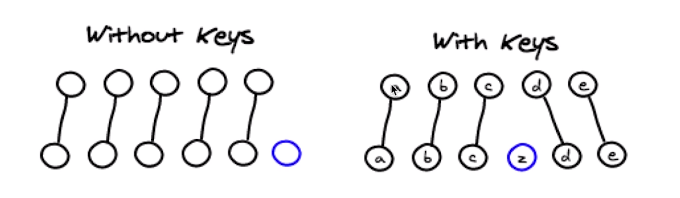
注意不要用数组的index作为key,因为数组的index是会变化的,这样会导致key不稳定。比如下图数组3个元素a,b,c,删除了a,实际上是a删除了,但是key值都变了,这样就失去了key存在的意义了。
a 0  b 1  c 2
|| 删除a
V
b 0  c 1
2
3
4
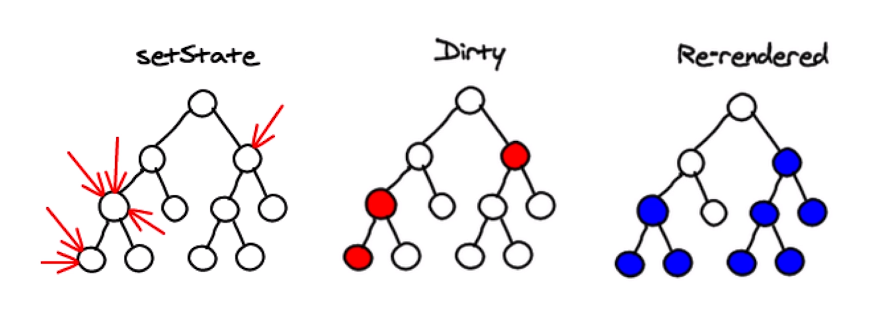
- 多次setState合成1次setState,提升性能。
# 十、react-transition-group 实现动画
在React里面可以使用react-transition-group实现动画。
import React, { Component, Fragment } from 'react'
import '../styles/styles.css'
import { CSSTransition } from 'react-transition-group'

export default class Animate extends Component {
    constructor(props) {
        super(props)
        this.state = {
            show: true
        }
    }
    toggle = () => {
        this.setState((state) => ({
            show: !state.show
        }))
    }
    render() {
        const { show } = this.state
        return (
            <Fragment>
                <CSSTransition
                    in={show}
                    timeout={1000}
                    classNames="fade"
                    onEntered={(el) => { el.style.color = 'red' }}
                    appear={true}
                >
                    {/* in 是状态,timeout是动画时间,className是应用的样式*/}
                    <div>hello</div>
                </CSSTransition>
                <button onClick={this.toggle}>toggle</button>
            </Fragment>
        )
    }
}
2
3
4
5
6
7
8
9
10
11
12
13
14
15
16
17
18
19
20
21
22
23
24
25
26
27
28
29
30
31
32
33
34
35
css,类名为fade,对应的钩子有如下:
/* 执行入场动画,在入场动画执行的第一个时刻,CSSTransition会往div上挂载样式,
这个样式的名字叫fade-enter */
.fade-enter,.fade-appear{
    opacity: 0;
}
/*执行入场动画,入场动画执行的第二个时刻,到入场动画执行完成之前的时刻,
如果已经完成了,这个样式就不存在了*/
.fade-enter-active,.fade-appear-active{
    opacity: 1;
    transition: all 1s ease-in
}
/* 整个入场动画执行完成的时候 */
.fade-enter-done{
    opacity: 1;
    /* 执行完后改变颜色 */
    color: blue ;
}

/* 执行出场动画,在出场动画执行的第一个时刻 */
.fade-exit{
    opacity: 1;
}
/*执行出场动画,出场动画执行的第二个时刻,到出场动画执行完成之前的时刻,
如果已经完成了,这个样式就不存在了*/
.fade-exit-active{
    opacity: 0;
    transition: all 1s ease-in
}
/* 整个出场动画执行完成的时候 */
.fade-exit-done{
    opacity: 0;
}
2
3
4
5
6
7
8
9
10
11
12
13
14
15
16
17
18
19
20
21
22
23
24
25
26
27
28
29
30
31
32
为了进页面的时候也显示动画,则需要加 .fade-appear和.fade-appear-active,配合 CSSTransition里加1个属性 appear={true}。
如果需要做多个动画,则需要用 TransitionGroup,在列表外层用TransitionGroup,里面的每项用CSSTransition。
# 十一、性能优化
(1)把bind统一放在constructor里面
constructor(props) {
    super(props)
    this.handleClick = this.handleClick.bind(this)
}
2
3
4
(2)setState 传递函数
 handleChange = (e) => {
    const value = e.target.value;
    this.setState(() => ({
        inputValue: value
    }))
}
2
3
4
5
6
(3)key不要用index,因为index不稳定
(4)借助 shouldComponentUpdate 来避免重新render
(5)使用react的PureComponent来避免子组件的重新渲染,它底层实现了shouldComponentUpdate,另外PureComponent要和immutable结合。
(6)函数组件在16.6.0 之后,可以使用 React.memo 来实现和PureComponent相同的功能。
const Test = React.memo(() => (
    <div>
        PureComponent
    </div>
))
2
3
4
5
# 十二、ref的使用
设置ref有两种方法:
(1)ref属性为回调函数,其它地方用this.input去获取这个真实DOM
<input id="input" value={inputValue} onChange={this.handleChange} ref={(input) => { this.input = input }}
/>

<ul ref={(ul) => { this.ul = ul }}>{this.getTodoItem()}</ul>
2
3
4
(2)ref属性为字符串,其它地方用this.refs.input去获取这个真实DOM
<input id="input" value={inputValue} onChange={this.handleChange} ref="input"/>
console.log(this.refs.input)
2
如果想在操作完数据后获取到最新的dom,则需要使用setState的第二个参数,即回调函数。因为setState是个异步函数。
// 错误写法
add = () => {
    this.setState((prevState) => {
        const { list, inputValue } = prevState;
        return {
            list: [...list, inputValue],
            inputValue: ''
        }
    })
    console.log(this.ul.querySelectorAll('li').length)
}

// 正确写法
add = () => {
    this.setState((prevState) => {
        const { list, inputValue } = prevState;
        return {
            list: [...list, inputValue],
            inputValue: ''
        }
    }, () => {
        console.log(this.ul.querySelectorAll('li').length)
    })
}
2
3
4
5
6
7
8
9
10
11
12
13
14
15
16
17
18
19
20
21
22
23
24
# 十三、其它
# Fragment
Fragment是react的一个组件,不会占位,但会包裹内层元素,类似于vue里面的template。使用方法如下
render() {
    return (
        <Fragment>
            <label htmlFor="input">输入内容</label>
            <button onClick={this.add}>添加</button>
        </Fragment>
    )
}
2
3
4
5
6
7
8
# dangerouslySetInnerHTML
使用 dangerouslySetInnerHTML 实现类似v-html的功能。
{
    list.map((t, i) =>
        <li key={i} dangerouslySetInnerHTML={{ __html: t }}>  </li>
    )
}
2
3
4
5
# htmlFor
react里,label里面的for不能使用,应该用htmlFor
<label htmlFor="input">输入内容</label>
<input id="input" value={inputValue} onChange={this.handleChange} />
2
# PropTypes 与 DefaultProps 的应用
PropTypes 用于规定props的数据类型,DefaultProps设置默认的值
// 限制props传值的类型
TodoItem.propTypes = {
    deleteItem: PropTypes.func,
    index: PropTypes.number,
    contentArr: PropTypes.arrayOf(PropTypes.number, PropTypes.string), // contentArr是一个数组,数组元素可以是字符串也可以是数字
    name: PropTypes.string.isRequired,  //  isRequired必须传递
    content: PropTypes.oneOfType([PropTypes.number, PropTypes.string])  // content的值可以是数字或字符串
}
// 默认的值
TodoItem.defaultProps = {
    test: 'hello'
}
2
3
4
5
6
7
8
9
10
11
12
# UI组件、容器组件、无状态组件
UI组件:负责页面的渲染,也叫傻瓜组件,只包含render函数,没有状态。
容器组件:负责页面的逻辑,也叫聪明组件。
无状态组件:就是函数组件,只有render,没有state。当一个组件只有render函数的时候,可以把它改造成函数组件。