
# React全家桶
# 一、Redux
Redux用于组件之间共享数据。在redux里面,通过dispatch actions来触发reducer,reducer返回新的状态。
# 工作流程
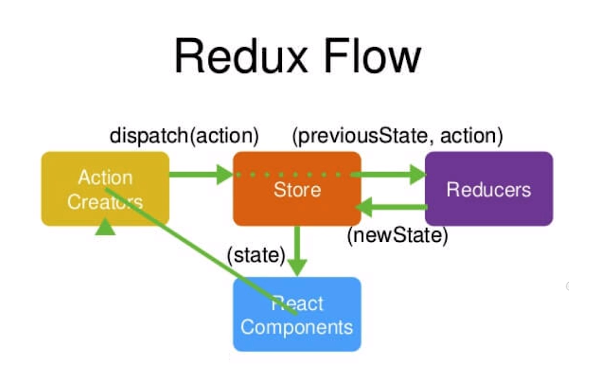
原则:
- store 是唯一的。
- 只有store能够改变自己的内容(state)。
- reducer 能够接收state,但绝不能修改state。
- reducer 是一个纯函数,纯函数指的是,给其固定的输入就会有固定的输出,而且不会有任何的副作用,像时间函数和有异步请求数据的函数都不是纯函数。
# 使用redux
安装redux:npm install redux --save。
- 需要一个store来存储数据
- store里面的reducer来初始化state,reducer根据传入的action的type,返回新的state
- 通过dispatch一个action来提交对数据的修改
- 每次提交数据变更后,dom并不会重新render,需要手动subscribe
(1)创建reducer,接收action,判断action的类型,然后返回新的state,新建store/reducer.js
//  默认的state
const defaultState = {
    list: [1, 2, 3],
    inputValue: '22'
}

export default (state = defaultState, action) => {
    // 根据action的类型返回新的state
    switch (action.type) {
        case 'change_input_value':
            return {
                ...state,
                inputValue: action.value
            }
        default:
            return state
    }
}
2
3
4
5
6
7
8
9
10
11
12
13
14
15
16
17
18
(2)创建store,新建store/index.js
  import { createStore, combineReducers } from 'redux'
+ import reducer from './reducer'  // 引入reducer
+ const store = createStore(reducer)  // 创建store
  export default store
2
3
4
(3)通过store.getState()来使用store的数据,通过 store.dispatch(action) 来改变状态
import store from '../store'
// 组件的constructor里面获取store
class TodoList extends Component{
    constructor(props) {
        super(props)
+       this.state = store.getState()  // 使用store的数据
    }
    handleChange = (e) => {
        const action = {
            type: 'change_input_value',
            value: e.target.value
        }
+       store.dispatch(action) // 通过dispatch来改变状态
    }
}
2
3
4
5
6
7
8
9
10
11
12
13
14
15
(4)组件内需要订阅状态的改变,才会更新
constructor(props) {
    super(props)
    this.state = store.getState()
+   store.subscribe(this.handleStoreChange)
}
handleStoreChange = () => {
+   this.setState(store.getState()) // 重新设置状态
}
2
3
4
5
6
7
8
# 使用redux devtools
安装redux devtools,然后配置的时候加以下代码
const store = createStore(
    reducer,
    window.__REDUX_DEVTOOLS_EXTENSION__ && window.__REDUX_DEVTOOLS_EXTENSION__()
)
2
3
4
# ActionTypes的拆分
把action放在一个文件里,统一管理。
(1)新建store/actionTypes.js
export const CHANGE_INPUT_VALUE = 'change_input_value'
(2)修改store/reducer.js
import * as actionTypes from './actionTypes'
//  默认的state
const defaultState = {
    list: [1, 2, 3],
    inputValue: '22'
}

export default (state = defaultState, action) => {
    switch (action.type) {
        case actionTypes.CHANGE_INPUT_VALUE:
            return {
                ...state,
                inputValue: action.value
            }
        default:
            return state
    }
}
2
3
4
5
6
7
8
9
10
11
12
13
14
15
16
17
18
# 使用 actionCreator 统一创建 action
新建store/actionCreator.js
import * as actionTypes from './actionTypes'
export const getInputChange = (value) => ({
    type: actionTypes.CHANGE_INPUT_VALUE,
    value
})
export const getAddList = (value) => ({
    type: actionTypes.ADD_LIST,
    value
})
export const getDeleteList = (value) => ({
    type: actionTypes.DELETE_LIST,
    value
})
2
3
4
5
6
7
8
9
10
11
12
13
组件内引入actions,调用对应的action,这样就很清晰了。
import * as actions from '../store/actionCreator'

add = () => {
    store.dispatch(actions.getAddList(this.state.inputValue))
}
handleChange = (e) => {
    store.dispatch(actions.getInputChange(e.target.value))
}
delete = (index = 0) => {
    store.dispatch(actions.getDeleteList(index))
}
2
3
4
5
6
7
8
9
10
11
# Redux中间件
原理就是对redux的dispath进行升级,使得它可以接收函数,处理更多的复杂逻辑,比如react-redux、redux-thunk等中间件。

# 二、react-redux
react-redux,作用是将redux整合到react中,获取store更方便,不用在每个组件内都引用store了。
# 使用react-redux
安装 npm install react-redux --save。 react-redux提供了两个api:
- Provider为后代组件提供store
- connect为组件提供数据和变更方法
(1)在入门口文件src/index.js里面引入react-redux
  import React from 'react';
  import ReactDOM from 'react-dom';
  import App from './App';
+ import { Provider } from 'react-redux'  // 使用Provider
+ import store from './store'
  const AppRedux = () => (
+     <Provider store={store}>
+         <App />
+     </Provider>
  )
  ReactDOM.render(<AppRedux />, document.getElementById('root'));
2
3
4
5
6
7
8
9
10
11
Provider的意思是连接store,使得里面的组件都可以用到store
(2)组件内使用connect中间件连接store
import React, { Component } from 'react'
import { connect } from 'react-redux'
import * as actions from '../store/actionCreator'  // 导入actions

// 使用react-redux来获取store
// 使用无状态组件提高性能
const TodoList2 = (props) => {
    const { list, inputValue, changeInput, add, handleDelete } = props;
    return (
        <div>
            <input value={inputValue} onChange={changeInput} />
            <button onClick={add}>提交</button>
            <ul>
                {list.map((t, i) => {
                    return (
                        <li key={i}>
                            <span>{t}</span>
                            <button onClick={() => handleDelete(i)}>删除</button>
                        </li>
                    )
                })}
            </ul>
        </div>
    )
}
+ // 把store的state映射到组件的props里面
+ const mapStateToProps = (state) => {
+     return {
+         inputValue: state.inputValue,
+         list: state.list
+     }
+ }
+ // 把dispath的方法映射到props里
+ const mapDispatchToProps = (dispatch) => {
+     return {
+         changeInput(e) {
+             dispatch(actions.getInputChange(e.target.value))
+         },
+        add() {
+             dispatch(actions.getAddList())
+         },
+         handleDelete(index = 0) {
+             dispatch(actions.getDeleteList(index))
+        }
+     }
+ }
+ // 连接store和TodoList2
+ export default connect(mapStateToProps, mapDispatchToProps)(TodoList2)
2
3
4
5
6
7
8
9
10
11
12
13
14
15
16
17
18
19
20
21
22
23
24
25
26
27
28
29
30
31
32
33
34
35
36
37
38
39
40
41
42
43
44
45
46
47
48
注意:connect会把UI组件转换成容器组件。
# 装饰器写法
组件内使用connect中间件连接store,可以使用更简洁的装饰器写法
import React, { Component } from 'react'
import { connect } from 'react-redux'
import * as actions from '../store/actionCreator'  // 导入actions

+ // 装饰器写法
+ @connect(
+     state => ({
+       inputValue: state.inputValue,
+       list: state.list
+     }),
+     {
+       changeInput: (e) => actions.getInputChange(e.target.value),
+       add: () => actions.getAddList(),
+       handleDelete:(index = 0)=>actions.getDeleteList(index)
+     }
+ )
class TodoList2 extends Component {
  render() {
      const { list, inputValue, changeInput, add, handleDelete } = props;
      return (
        <div>
            <input value={inputValue} onChange={changeInput} />
            <button onClick={add}>提交</button>
            <ul>
                {list.map((t, i) => {
                    return (
                        <li key={i}>
                            <span>{t}</span>
                            <button onClick={() => handleDelete(i)}>删除</button>
                        </li>
                    )
                })}
            </ul>
        </div>
      )
  }
}
export default TodoList2
2
3
4
5
6
7
8
9
10
11
12
13
14
15
16
17
18
19
20
21
22
23
24
25
26
27
28
29
30
31
32
33
34
35
36
37
38
当然,这里用到了装饰器,需要安装额外的插件:npm install @babel/plugin-proposal-decorators,
安装后再package.json里面加一句话(babel里面plugins那句):
{
  "babel": {
      "plugins": [
        [
+         "@babel/plugin-proposal-decorators",
+          {
+            "legacy": true
+          }
        ]
      ],
      "presets": [
        "react-app"
      ]
  }
}
2
3
4
5
6
7
8
9
10
11
12
13
14
15
# 三、redux-thunk
react默认只支持同步,实现异步任务需要中间件的支持。npm install redux-thunk --save。redux-thunk主要是把异步操作放到action里面。
# 使用redux-thunk
(1)安装redux-thunk并注入store
import { createStore, combineReducers, applyMiddleware, compose } from 'redux'
import thunk from 'redux-thunk'
import reducer from './reducer'

const composeEnhancers = window.__REDUX_DEVTOOLS_EXTENSION_COMPOSE__ ?
    window.__REDUX_DEVTOOLS_EXTENSION_COMPOSE__({}) : compose;

const enhancer = composeEnhancers(
    applyMiddleware(thunk)
);

const store = createStore(
    reducer,
    enhancer
)

export default store
2
3
4
5
6
7
8
9
10
11
12
13
14
15
16
17
(2)action里面返回一个异步函数
import * as actionTypes from './actionTypes'
import axios from 'axios'
export const getInitList = (value) => ({
    type: actionTypes.INIT_LIST,
    value
})

export const getTodoList = () => {
    // 返回一个函数
    return (dispatch) => {
        axios.get("http://127.0.0.1:8000/list").then((res) => {
            dispatch(getInitList(res.data))
        })
    }
}
2
3
4
5
6
7
8
9
10
11
12
13
14
15
(3)组件内dispatch这个函数
 componentDidMount() {
    store.dispatch(actions.getTodoList())
}
2
3
# 代码优化(抽离reducer和action)
组件里面的@connect代码太臃肿,我们需要把它抽离出来。把action抽离出来就好了。下面是新的案例。
1、新建store/counter.js,专门用于处理counter的逻辑
export const counterReducer = (state = 0, action) => {
    // action,即dispatch传递过来的值
    switch (action.type) {
        case 'add':
            return state + 1
        case 'minus':
            return state - 1
        default:
            return state
    }
}

export const add = () => ({ type: "add" }); // action creator
export const minus = () => ({ type: "minus" }); // action creator
export const asyncAdd = () => dispatch => {
    setTimeout(() => {
        // 异步结束后,手动执行dispatch
        dispatch({ type: "add" });
    }, 1000);
}
2
3
4
5
6
7
8
9
10
11
12
13
14
15
16
17
18
19
20
2、修改 store/index.js
import { createStore, applyMiddleware } from "redux";
import logger from "redux-logger";
import thunk from "redux-thunk";
import { counterReducer } from './counter';

const store = createStore(counterReducer, applyMiddleware(logger, thunk));
export default store
2
3
4
5
6
7
3、修改ReduxTest.js
import React, { Component } from "react";
import { connect } from 'react-redux';
import { add, minus, asyncAdd } from '../store/counter'
@connect(
    state => ({ num: state }), // 状态映射
    { add, minus, asyncAdd }
)
class ReduxTest extends Component {
    render() {
        return (
            <div>
                <p>{this.props.num}</p>
                <div>
                    <button onClick={this.props.add}>+</button>
                    <button onClick={this.props.minus}>-</button>
                    <button onClick={this.props.asyncAdd}>异步+</button>
                </div>
            </div>
        );
    }
}
export default ReduxTest
2
3
4
5
6
7
8
9
10
11
12
13
14
15
16
17
18
19
20
21
22
# 模块化
如果有多个reducer,则需要使用模块化,用combineReducers把多个reducer串联起来。
1、修改 store/index.js
import { createStore, applyMiddleware, combineReducers } from "redux";
import logger from "redux-logger";
import thunk from "redux-thunk";
import { counterReducer } from './counter'; // 第一个reducer
import { calcReducer } from './calc'; // 第二个reducer

// 多个reducer
const store = createStore(
    combineReducers({ counter: counterReducer },{ calc: calcReducer }),
    applyMiddleware(logger, thunk)
);
export default store
2
3
4
5
6
7
8
9
10
11
12
2、修改 store/counter.js
@connect(
    state => ({ num: state.counter }), // 添加一个counter
    { add, minus, asyncAdd }
)
2
3
4
# 四、redux原理及实现
核心实现:
- 存储状态state
- 获取状态getState
- 更新状态dispatch
- 变更订阅subscrib
1、kredux.js
export function createStore(reducer, enhancer) {
  // 如果存在enhancer
  if (enhancer) {
    return enhancer(createStore)(reducer);
  }

  let currentState = undefined;
  const currentListeners = []; // 回调函数数组

  function getState() {
    return currentState;
  }
  // 更新状态
  function dispatch(action) {
    // 修改
    currentState = reducer(currentState, action);
    // 变更通知
    currentListeners.forEach(v => v());
    return action;
  }
  function subscribe(cb) {
    currentListeners.push(cb);
  }

  // 初始化状态
  dispatch({ type: "@IMOOC/INIT" });

  return {
    getState,
    dispatch,
    subscribe
  };
}

export function applyMiddleware(...middlewares) {
 // 为啥要传createStore,因为需要在中间件里面先完成createStore工作,传入方式看createStore代码
  return createStore => (...args) => {
  console.log(args)  // args其实是传进来的reducer,看createStore代码
    // 完成之前createStore工作
    const store = createStore(...args);
    // 原先dispatch
    let dispatch = store.dispatch;
    // 传递给中间件函数的参数
    const midApi = {
      getState: store.getState,
      dispatch: (...args) => dispatch(...args)
    };
    // 将来中间件函数签名如下: funtion ({}) {}
    //[fn1(dispatch),fn2(dispatch)] => fn(diaptch)
    const chain = middlewares.map(mw => mw(midApi));
    // 强化dispatch,让他可以按顺序执行中间件函数
    dispatch = compose(...chain)(store.dispatch);
    // 返回全新store,仅更新强化过的dispatch函数
    return {
      ...store,
      dispatch
    };
  };
}

export function compose(...funcs) {
  if (funcs.length === 0) {
    return arg => arg;
  }
  if (funcs.length === 1) {
    return funcs[0];
  }
  // 聚合函数数组为一个函数 [fn1,fn2] => fn2(fn1())
  return funcs.reduce((left, right) => (...args) => right(left(...args)));  // args是store.dispatch
}
2
3
4
5
6
7
8
9
10
11
12
13
14
15
16
17
18
19
20
21
22
23
24
25
26
27
28
29
30
31
32
33
34
35
36
37
38
39
40
41
42
43
44
45
46
47
48
49
50
51
52
53
54
55
56
57
58
59
60
61
62
63
64
65
66
67
68
69
70
2、MyReduxTest.js
import React, { Component } from "react";
import { createStore, applyMiddleware } from "../store/kredux";

const counterReducer = function(state = 0, action) {
  const num = action.payload || 1;
  switch (action.type) {
    case "add":
      return state + num;
    case "minus":
      return state - num;
    default:
      return state;
  }
};

// 自定义中间件
function logger() {
  // 返回真正中间件任务执行函数
  return dispatch => action => {
    // 执行中间件任务
    console.log(action.type + "执行了!!!");

    // 执行下一个中间件
    return dispatch(action);
  };
}
// thunk实现
const thunk = ({getState}) => dispatch => action => {
  // thunk逻辑:处理函数action
	if (typeof action == 'function') {
    return action(dispatch, getState)
  }
  // 不是函数直接跳过
	return dispatch(action)
}

const store = createStore(counterReducer, applyMiddleware(logger, thunk));

export default class MyReduxTest extends Component {
  componentDidMount() {
    store.subscribe(() => this.forceUpdate());
  }
  render() {
    return (
      <div>
        {store.getState()}
        <button onClick={() => store.dispatch({ type: "add" })}>+</button>
        <button onClick={() => store.dispatch(function(){
            setTimeout(() => {
                store.dispatch({ type: "add" })
            }, 1000);
        })}>+</button>
      </div>
    );
  }
}
2
3
4
5
6
7
8
9
10
11
12
13
14
15
16
17
18
19
20
21
22
23
24
25
26
27
28
29
30
31
32
33
34
35
36
37
38
39
40
41
42
43
44
45
46
47
48
49
50
51
52
53
54
55
56
# 五、react-router
react-router中奉行一切皆组件的思想,路由器-Router、链接-Link、路由-Route、独占-Switch、重定向Redirect都以组件形式存在。
安装 : npm install --save react-router-dom 。
# 基本使用
import React, { Component } from 'react'
import { BrowserRouter, Link, Route, Switch, Redirect } from "react-router-dom";

function ProductList(props) {
    return (
        <div>
            <h3>ProductList</h3>
            <Link to="/detail">产品列表</Link>
        </div>
    );
}

//  (嵌套) Route组件嵌套在其他页面组件中就产生了嵌套关系,下面ProductMgt组件里面就包含了嵌套的路由
function ProductMgt(props) {
    return (
        <div>
            <h3>ProductMgt</h3>
            <Link to="/management/add">新增商品</Link>
            <Link to="/management/search">搜索商品</Link>
            {/* 子路由 */}
            <Route path="/management/add" component={() => <div>add</div>} />
            <Route path="/management/search" component={() => <div>search</div>} />
            {/* 重定向 */}
            <Redirect to="/management/add" />
        </div>
    );
}

// 动态路由,使用:id的形式定义动态路由
function Detail({ match, history, location }) {
    console.log(match, history, location); // 打印结果看图
    return (
        <div>
            ProductMgt
            <p>{match.params.name}</p>
        </div>
    );
}

// 创建PrivateRoute组件包装Route使其具有权限判断功能
function PrivateRoute({ component: Component, isLogin, ...rest }) {
    // 单独解构出component和isLogin
    // component为渲染目标组件,isLogin通常来自Redux
    // rest为传递给Route的属性
    // render可以进行条件渲染
    return (
        <Route {...rest} render={
            // props包含match等信息直接传给目标组件
            props => isLogin ? ( // 若登陆渲染目标组件
                <Component {...props} />
            ) : ( // 未登录重定向到Login
                    <Redirect to={{ pathname: "/login", state: { redirect: props.location.pathname } }}// 重定向地址
                    />
                )
        }
        />
    );
}

function Login({ location, isLogin, login }) {
    const redirect = location.state.redirect || "/"; // 重定向地址
    console.log(location, isLogin, login)
    if (isLogin) return <Redirect to={redirect} />;
    return (
        <div>
            <p>用户登录44</p>
            <hr />
            <button onClick={login}>登录</button>
        </div>
    );
}


export default class RouterTest extends Component {
    render() {
        return (
            <BrowserRouter>
                {/* 导航 */}
                <nav>
                    <Link to="/">商品列表</Link>
                    <Link to="/management">商品管理</Link>
                </nav>
                <div>
                    {/* 直接在组件中定义路由 */}
                    {/* react-router匹配不是独占,根路由要添加exact(即精确匹配),render可以实现条件渲染 */}
                    <Route exact path="/" component={ProductList} />
                    <PrivateRoute path="/management" component={ProductMgt} isLogin={true} />
                    <Route path="/login" component={Login} />
                    <Route path="/detail/:name" component={Detail} />
                </div>
            </BrowserRouter>
        )
    }
}
2
3
4
5
6
7
8
9
10
11
12
13
14
15
16
17
18
19
20
21
22
23
24
25
26
27
28
29
30
31
32
33
34
35
36
37
38
39
40
41
42
43
44
45
46
47
48
49
50
51
52
53
54
55
56
57
58
59
60
61
62
63
64
65
66
67
68
69
70
71
72
73
74
75
76
77
78
79
80
81
82
83
84
85
86
87
88
89
90
91
92
93
94
95
# 404页面
设定一个没有path的路由在路由列表最后面,表示一定匹配
{/* 添加Switch表示仅匹配一个 */}
<Switch>
    {/* 首页重定向换成Route方式处理避免影响404 */}
    <Route exact path="/" render={props => <Redirect to="/list" />} />
    {/* <Redirect to="/list"></Redirect> */}
    <Route component={() => <h3>页面不存在</h3>}></Route>
</Switch>
2
3
4
5
6
7
# 路由守卫
创建PrivateRoute组件包装Route使其具有权限判断功能
// 创建PrivateRoute组件包装Route使其具有权限判断功能
function PrivateRoute({ component: Component, isLogin, ...rest }) {
    // 单独解构出component和isLogin
    // component为渲染目标组件,isLogin通常来自Redux
    // rest为传递给Route的属性
    // render可以进行条件渲染
    return (
        <Route {...rest} render={
            // props包含match等信息直接传给目标组件
            props => isLogin ? ( // 若登陆渲染目标组件
                <Component {...props} />
            ) : ( // 未登录重定向到Login
                    <Redirect to={{ pathname: "/login", state: { redirect: props.location.pathname } }}// 重定向地址
                    />
                )
        }
        />
    );
}

<PrivateRoute path="/management" component={ProductMgt} isLogin={true} />
2
3
4
5
6
7
8
9
10
11
12
13
14
15
16
17
18
19
20
21
组件内使用<Link>来实现跳转
<Link key={index} to={'/detail/' + item.get('id')}> <Link>
Detail组件 接收路由参数 this.props.match.params.id
# 异步组件及withRouter方法的使用
使用 react-loadable 来实现异步组件。
loadable.js,创建异步组件LoadableComponent。
import React from 'react';
import Loadable from 'react-loadable';

const LoadableComponent = Loadable({
  loader: () => import('./index'),
  loading() {
  	return <div>正在加载</div>
  }
});

export default () => <LoadableComponent/>
2
3
4
5
6
7
8
9
10
11
loader,即要加载的组件,loading是组件加载完成前展示的内容。
index.js,定义要加载的组件Detail,Detail要用withRouter包裹一下。
import React, { PureComponent } from 'react';
import { connect } from 'react-redux';
import { withRouter } from 'react-router-dom';
import { DetailWrapper, Header, Content } from './style';
import { actionCreators } from './store';

class Detail extends PureComponent {
	render() {
		return (
			<DetailWrapper>
				<Header>{this.props.title}</Header>
				<Content
					dangerouslySetInnerHTML={{__html: this.props.content}}
				/>
			</DetailWrapper>
		)
	}

	componentDidMount() {
		this.props.getDetail(this.props.match.params.id);
	}
}

const mapState = (state) => ({
	title: state.getIn(['detail', 'title']),
	content: state.getIn(['detail', 'content'])
});

const mapDispatch = (dispatch) => ({
	getDetail(id) {
		dispatch(actionCreators.getDetail(id));
	}
});

export default connect(mapState, mapDispatch)(withRouter(Detail));
2
3
4
5
6
7
8
9
10
11
12
13
14
15
16
17
18
19
20
21
22
23
24
25
26
27
28
29
30
31
32
33
34
35
其它地方导入异步组件:
import Detail from './pages/detail/loadable.js';
# 六、react-router原理及实现
react-router 一切皆组件,因此实现的核心就是BrowserRouter、Route、Link。
- BrowserRouter 历史记录管理对象history初始化及向下传递,location变更监听
- Route:路由配置,匹配检测,内容渲染
- Link.js: 跳转链接,处理点击事件
import React, { Component } from "react";
import { createBrowserHistory } from "history";
import pathToRegexp from "path-to-regexp";

const cache = {};
const cacheLimit = 10000;
let cacheCount = 0;

// /detail/web <==> /detail/:name
function compilePath(path, options) {
  const cacheKey = `${options.end}${options.strict}${options.sensitive}`;
  const pathCache = cache[cacheKey] || (cache[cacheKey] = {});

  if (pathCache[path]) return pathCache[path];

  const keys = [];
  const regexp = pathToRegexp(path, keys, options);
  const result = { regexp, keys };

  if (cacheCount < cacheLimit) {
    pathCache[path] = result;
    cacheCount++;
  }

  return result;
}

/**
 * Public API for matching a URL pathname to a path.
 */
function matchPath(pathname, options = {}) {
  if (typeof options === "string") options = { path: options };

  // 用户在Route上配置的path
  const { path, exact = false, strict = false, sensitive = false } = options;

  const paths = [].concat(path);

  return paths.reduce((matched, path) => {
    if (!path) return null;
    if (matched) return matched;

    // detail/web/1
    const { regexp, keys } = compilePath(path, {
      end: exact,
      strict,
      sensitive
    });
    const match = regexp.exec(pathname);

    if (!match) return null;

    const [url, ...values] = match;
    const isExact = pathname === url;

    if (exact && !isExact) return null;

    return {
      path, // the path used to match
      url: path === "/" && url === "" ? "/" : url, // the matched portion of the URL
      isExact, // whether or not we matched exactly
      params: keys.reduce((memo, key, index) => {
        memo[key.name] = values[index];
        return memo;
      }, {})
    };
  }, null);
}

//创建一个上下文保存history、location等
const RouterContext = React.createContext();

// BrowserRouter:管理历史记录变更,location变更等等,并传递给后代
class BrowserRouter extends Component {
  constructor(props) {
    super(props);
    // 创建浏览器history对象
    this.history = createBrowserHistory(this.props);
    // 创建状态管理location
    this.state = {
      location: this.history.location
    };
    // 开启监听
    this.unlisten = this.history.listen(location => {
      this.setState({ location });
    });
  }
  componentWillUnmount() {
    if (this.unlisten) {
      this.unlisten();
    }
  }
  render() {
    return (
      <RouterContext.Provider
        value={{
          history: this.history,
          location: this.state.location
        }}
        children={this.props.children}
      />
    );
  }
}

class Route extends Component {
  render() {
    return (
      <RouterContext.Consumer>
        {context => {
          const location = context.location;
          // 根据pathname和用户传递props获得match对象
          const match = matchPath(location.pathname, this.props);
          // 要传递一些参数
          const props = { ...context, match };
          // children component render
          let { children, component, render } = this.props;
          if (children && typeof children === "function") {
            children = children(props);
          }
          return (
            <RouterContext.Provider value={props}>
              {children // children优先级最高,不论匹配与否存在就执行
                ? children
                : (props.match // 后面的component和render必须匹配
                ? (component // 若匹配首先查找component
                  ? React.createElement(component) // 若它存在渲染之
                  : (render // 若render选项存在
                  ? render(props) // 按render渲染结果
                  : null))
                : null)}
            </RouterContext.Provider>
          );
        }}
      </RouterContext.Consumer>
    );
  }
}

class Link extends React.Component {
  handleClick(event, history) {
    event.preventDefault();
    history.push(this.props.to);
  }

  render() {
    const { to, ...rest } = this.props;

    return (
      <RouterContext.Consumer>
        {context => {
          return (
            <a
              {...rest}
              onClick={event => this.handleClick(event, context.history)}
              href={to}
            >
              {this.props.children}
            </a>
          );
        }}
      </RouterContext.Consumer>
    );
  }
}

export default class MyRouterTest extends Component {
  render() {
    return (
      <BrowserRouter>
        <Link to="/foo">foo</Link>
        <Link to="/bar">bar</Link>
        <Link to="/mua/abc">mua</Link>
        <Route path="/foo" component={() => <div>foo</div>} />
        <Route path="/bar" component={() => <div>bar</div>} />
        <Route path="/mua/:ns" render={({ match }) => match.params.ns} />
        <Route children={({location}) => "xxx"} />
      </BrowserRouter>
    );
  }
}
2
3
4
5
6
7
8
9
10
11
12
13
14
15
16
17
18
19
20
21
22
23
24
25
26
27
28
29
30
31
32
33
34
35
36
37
38
39
40
41
42
43
44
45
46
47
48
49
50
51
52
53
54
55
56
57
58
59
60
61
62
63
64
65
66
67
68
69
70
71
72
73
74
75
76
77
78
79
80
81
82
83
84
85
86
87
88
89
90
91
92
93
94
95
96
97
98
99
100
101
102
103
104
105
106
107
108
109
110
111
112
113
114
115
116
117
118
119
120
121
122
123
124
125
126
127
128
129
130
131
132
133
134
135
136
137
138
139
140
141
142
143
144
145
146
147
148
149
150
151
152
153
154
155
156
157
158
159
160
161
162
163
164
165
166
167
168
169
170
171
172
173
174
175
176
177
178
179
180
181
# 七、Immutable.js
使用 Immutable.js 来管理store中的数据,Immutable.js 保证state数据不可改变。 immutable对象的set方法,会结合之前immutable对象的值和设置的值,返回一个全新的对象。
# 使用Immutable.js
header/reducer.js
import * as constants from './constants';
import { fromJS } from 'immutable';

// fromJS会把对象转成immutable对象
const defaultState = fromJS({
	focused: false,
	mouseIn: false,
	list: [],
	page: 1,
	totalPage: 1
});

export default (state = defaultState, action) => {
	switch(action.type) {
		case constants.SEARCH_FOCUS:
			return state.set('focused', true);
		case constants.SEARCH_BLUR:
			return state.set('focused', false);
		case constants.CHANGE_LIST:
			return state.merge({
				list: action.data,
				totalPage: action.totalPage
			});
		case constants.MOUSE_ENTER:
			return state.set('mouseIn', true);
		case constants.MOUSE_LEAVE:
			return state.set('mouseIn', false);
		case constants.CHANGE_PAGE:
			return state.set('page', action.page);
		default:
			return state;
	}
}
2
3
4
5
6
7
8
9
10
11
12
13
14
15
16
17
18
19
20
21
22
23
24
25
26
27
28
29
30
31
32
33
组件内使用
const mapStateToProps = (state) => {
	return {
		focused: state.header.get('focused')),
	}
}
2
3
4
5
# 使用redux-immutable
由于state.header.get('focused'))里面,state是不可变对象,调用.header显得有点突然。所以使用redux-immutable,主要是用redux-immutable的combineReducers方法。
顶级的reducer,连接各个reducer
import { combineReducers } from 'redux-immutable';
import { reducer as headerReducer } from '../common/header/store';
import { reducer as homeReducer } from '../pages/home/store';
import { reducer as detailReducer } from '../pages/detail/store';
import { reducer as loginReducer } from '../pages/login/store';

const reducer = combineReducers({
	header: headerReducer,
	home: homeReducer,
	detail: detailReducer,
	login: loginReducer
});

export default reducer;
2
3
4
5
6
7
8
9
10
11
12
13
14
组件内用
const mapStateToProps = (state) => {
	return {
		focused: state.getIn(['header', 'focused'])
	}
}
2
3
4
5
取state的header里面的focused
改状态的时候,因为state的里面list被转换成了immutable对象,所以修改数据的时候,传递的数据也要用fromJS
const changeList = (data) => ({
	type: constants.CHANGE_LIST,
	data: fromJS(data),
	totalPage: Math.ceil(data.length / 10)
});
2
3
4
5
组件内取数据的时候,把immutable对象转成普通js对象即可。
const newList = list.toJS();
← React组件化 React hooks →